Set Up Your Code Aster Analysis for CloudHPC
How many times have you wanted to launch a FEA/FEM analysis on Code Aster but did not have the necessary computing power?
In this article we show you how you can overcome this problem by carrying out an analysis on the CloudHPC website, a computing resource service made available by the CFD FEA Service.
Let’s see the step-by-step procedure.
Setting up the Code Aster files:
To automatically create the 3 files necessary for the analysis click with the right mouse button on CurrentCase and press Export Case.

The three files that will be created are:
- .comm file;
- .med file;
- .export file;

Edit the .export file.
Check the .export file and, if necessary, manually add the following command to request the output files.
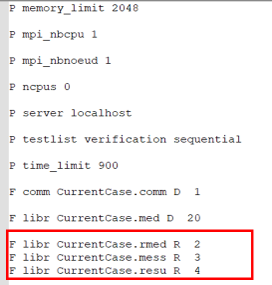
Be sure that the logical output number is equal to the one imposed in .comm file. To make sure you include all of them, check the file .comm the output logic in IMPR_RESU or IMPR_TABLE.
Upload the files to CloudHPC
After login to CloudHPC, to load the data enter in the Storage section and click on the Add button [+].

As a first step, write the name of the folder you want to be created as a container for your data.
Secondly, to store the data drag the files in the drag&drop section.
Press save.
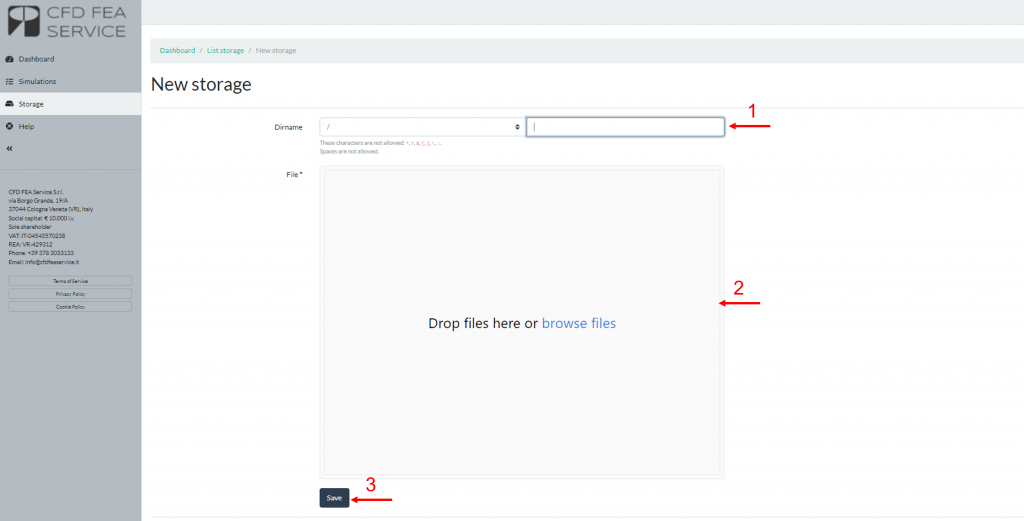
Launching the simulation
Go to Simulation and click on the Add button [+].

Set the number of vCPUs you want to use, the amount of RAM per CPU, the folder where you uploaded your files and the Code Aster solver you want to use. Click on Save.
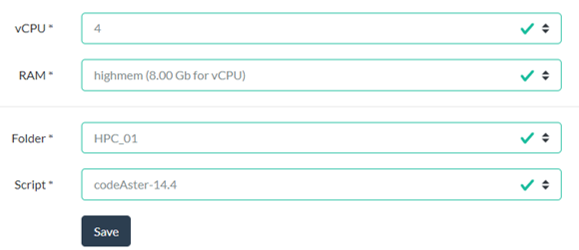
Now the simulation has started.
Simulation Monitoring
While the analysis proceeds, you can monitor the simulation by clicking on the View icon.

You will enter a new page where it is possible to read the log file or access the remote desktop.
Download the output files
When the simulation is completed go to the storage page, enter the folder where you saved the .export file and download the file you need (for this simulation the request was the .rmed file)

If you want, you can check the results directly on you remote desktop.
For more information see this page.
CloudHPC is a HPC provider to run engineering simulations on the cloud. CloudHPC provides from 1 to 224 vCPUs for each process in several configuration of HPC infrastructure - both multi-thread and multi-core. Current software ranges includes several CAE, CFD, FEA, FEM software among which OpenFOAM, FDS, Blender and several others.
New users benefit of a FREE trial of 300 vCPU/Hours to be used on the platform in order to test the platform, all each features and verify if it is suitable for their needs


3 Comments
code_aster cluster MPI execution - Cloud HPC · 15 September 2022 at 4:54 pm
[…] basic info in his input files so the system can handle this situation in code_aster cluster. The default configuration doesn’t allow to run your analysis in a code_aster cluster. Let’s have a look at the […]
How to PostProcessing Code_Aster FEM results on cloudHPC - Cloud HPC · 27 November 2022 at 11:41 pm
[…] IMPORTANT: you will first have launch the simulation inside CloudHPC. If you want to know how to do it, look at this link. […]
Execute Code Aster from Windows on cloudHPC - Cloud HPC · 30 December 2022 at 11:02 am
[…] we have to set up the folder with the necessary files inside and set as mentioned in this article. Put these files inside a single folder and name it with an easily recognizable […]